Tuesday, July 28, 2009

Fish Tacos

Every year about this time my Dad and Mary go over to the coast and get tuna and we can it. I always like to take some of the nicer parts and make some dinners out of it and then I preserve the rest. It is really the biggest difference to can the tuna yourself. It is not mushy at all and I will never go back to store bought if I can help it:)
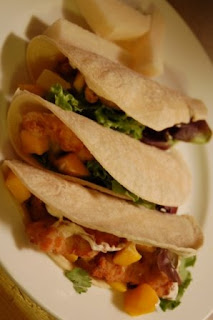
Last night I made fish tacos with the tuna and it turned out pretty darned good. I have made it with several different kinds of fish. You can really use just about anything you like. I have made it with cod, halibut, flounder and the tuna of course. I have also had them in restaurants using salmon so it really runs the spectrum on what kind looks good and fresh.

Fish Tacos

This recipe is really subjective to how many you are making. I will use the portions I would do for Jake and I and you just add to it based on having more portions. It is like most of my dinners kind of a formula more than a recipe..

  • 1 lb of fish, cut into 1 inch wide strips or chunks
  • 1/2 cup milk or half and half
  • salt and pepper to taste
  • 1/2 cup flour
  • 3 Tbs canola oil

  • 1/4 cup sour cream
  • 1/2 tsp southwest seasoning or could use a little cayenne and mostly paprika
  • 1 tsp lemon juice

To serve:

  • 6 corn tortillas, warmed in the oven if you like
  • mango salsa (See below)
  • shredded lettuce or cabbage (whatever you prefer)
  • cilantro leaves (optional)

In a shallow bowl or pie plate combine the milk or half and half and the salt and pepper. Put the fish in the milk and marinate it for as long as you have15-2 hours is fine.

In a small bowl combine the sour cream, seasoning and lemon juice and place in the refrigerator to meld the flavors.

I normally get all of the accompaniments together and let the salsa set while the fish is soaking and then I can pull it all together quickly when the fish is done. In a medium skillet heat up the oil over medium heat. In another shallow dish put in the flour and piece by piece dredge the fish pieces in the flour and put into the hot oil. Fry 2 minutes or so on the first side and then a minute or so on the second side until they are nicely browned and done through. If you have thick pieces or a dense fish it may take a bit longer. Once the fish is done remove it to a paper towel lined plate and serve with your accompaniments.


Mango Salsa
  • 1 small can tid-bit pineapple, can use fresh if you have it
  • 1 mango chopped
  • 1/2 jalapeno pepper, chopped
  • dash of salt
  • 1 Tbs lemon or lime juice

In a small bowl combine all ingredients and stir well. Cover and refrigerate at least 30 minutes for the flavors to come out.


I normally set it out as you see above and you can compile your own tacos. I like a smear of the sour cream and then a couple pieces of fish topped with the salsa, some cilantro and lettuce. With some chips and guacamole or sliced jicama it is a cool summer dinner and oh so tasty with a cold beer!


Sunday, July 26, 2009

Blueberry Coffee Cake Muffins

These Blueberry muffins are more of a cake like muffin. I modified it from The America's Test Kitchen Family Baking Book on a plain muffin recipe they have. I made mine in a jumbo silicone muffin cup but you can definitely fill a regular sized muffin tray lined with cupcake papers.


The really nice thing about this recipe is that it is all done in the food processor making it quick and easy! You could do it by hand with a pastry blender and spoon if you want a work out:)

Blueberry Coffee Cake Muffins
  • 1 cup granulate sugar
  • 1 1/2 cups flour
  • 1/2 cup packed dark brown sugar
  • 1 Tbs cinnamon
  • 1/2 tsp baking powder
  • 1/2 tsp salt
  • 1/2 tsp baking powder
  • 1 1/2 sticks unsalted butter, chilled and cut into pieces
  • 3 eggs
  • 1/2 c plain yogurt or sour cream
  • 1 1/2 c blueberries dusted with 1 Tbs flour

Preheat oven to 350 degrees and oil or place the liners in your muffins cups/tin.

In the bowl of your food processor pulse the white sugar, 1/2 cup flour and 1/4 cup brown sugar together. Remove 3/4 cup of this mixture to a small bowl and whisk in the 1/4 more brown sugar and the cinnamon. Set aside, this is your streusel topping.

Put 1 c of remaining flour, baking powder, salt and baking soda in the food processor and pulse until combined. Now add the butter and pulse until it is like course sand. Add the eggs and yogurt an pulse again until combined.

Now transfer to a medium bowl and stir in the blueberries until just combined. With a ice cream scoop fill the muffin cups 1/3 full and then sprinkle a good covering of the streusel topping on the batter. Top with another scoop of batter to fill it 2/3-3/4 full. Top the batter with another generous sprinkling of the topping and you are ready for the oven. Bake for 20 until a toothpick comes out clean. I think mine took 25-30 minutes or so because the muffins were bigger.

Cool slightly in the pan and then turn out to finish cooling on a wire rack.


Glazed Salmon

What was for dinner tonight you might ask? We had the glazed salmon above and it was quite good if I say so myself. I have been making this for a long time. My step dad Dan originally made this back in the day when I lived at home and I still make it and it is a good one. Thank you Dan!
To start out I always rinse the salmon fillet and then pat it dry with paper towels. Season with a bit of salt and pepper and top with lemon slices if you are planning to grill it. You can cook the salmon a number of ways. Dan always grilled it in a aluminum foil "pan" you folded up with double layers of foil and I still make it that way most of the time. I do make it in the winter though in the oven and broil it skin side up first for 8 minutes or so and then flip and cook until flaky.

While the fish is cooking take 2 cloves of garlic and chop it finely and place it in a small bowl. In the bowl add 3 Tbs of sweet cream butter and cook in the microwave for 45 seconds until melted and you can smell the garlic well. Stir in 1/4 cup brown sugar until it makes a thin paste. Let sit until the salmon is done and then top it with the sauce when you plate it and the fish is still hot. The sauce will melt into the salmon and become more of a glaze.
Enjoy! This is a simple recipe but tastes like it takes a lot more effort.

Thursday, July 23, 2009

Cream Wafers

This week on Friday Baking with Not Quite June Cleaver I made Cream Wafers. They are a flaky, creamy treat and they turned out well I think and very pretty. I agree that they would be very tasty with coffee! You should really go to the link above and get this recipe.


I am normally not a fussy cookie person but these cookies were pretty painless if I do say so!


Tuesday, July 21, 2009

Breakfast Burritos

So I love to make breakfast burritos. They are pretty quick to put together and the beauty is that you can make a bunch at once and then freeze them. All you have to do on a morning before work is cover one with a paper towel and zap it for 45 seconds, get out a little salsa to serve with it and you are good to go! Very satisfying I must say.


Breakfast Burritos

1 12 oz package of Chorizo
1 lb breakfast sausage (you can use all breakfast sausage if you prefer it very mild)
4 medium potatoes, peeled and chopped
4-6 large Crimini mushrooms, chopped
6 large eggs, beaten
salt and pepper to taste
2 cups shredded cheese
18 or so medium flour tortillas
Preheat the oven to low - 200 and place the tortillas in foil wrapping and place in the oven to get warm and soften. In a large non stick skillet cook the Chorizo and sausage until cooked through and broken up into small pieces. Next add the potatoes and mushrooms and cook over medium-low until they are tender and cooked through. Pour in your beaten eggs and stir occasionally until the eggs are mixed throughout and scrambled together. Season with salt and pepper to taste.
I find it easiest to make an assembly line so have your tortillas, then your skillet, then you cheese and have your freezer bags ready as you finish them. In your tortillas scoop about 1/4 cup of filling in each one and top with a sprinkling of cheese. Fold up the bottom of the tortilla and then then sides. Place in your freezer bag and then keep going until you have them all filled and packaged.
You can make this on a smaller scale of course just for breakfast and you can also make some for breakfast and then compile the leftovers for the freezer. That is what I usually do. Just make sure you put them in the oven for a little while to melt the cheese and heat them together a bit for best results. Enjoy!

Thursday, July 16, 2009

Strawberry Cheese Blintzes


Jake and I love to have blintzes for breakfast on the weekends. It is a kind of indulgence that tastes so good and is sort of a mix of richness and clean fruit flavors. With a little bacon on the side it is perfect! It is an involved recipe but is a fun one to do on the weekend when you have time to do it and sip coffee as you are cooking.


Strawberry Cheese Blintzes


Crepes


2 eggs
1/2 tsp salt
1/2 tsp sugar
1 c milk
1 c flour
1 Tbs butter, melted

In a medium sized bowl beat the eggs with the salt and sugar until frothy. Alternating between flour and milk whisk in until both are completely combined into a batter. Once it is all combined whisk in the butter. In a crepe pan spray with non stick spray put a 1/4 cup of batter down on the pan and rotate until the pan is coated with the batter. Cook over medium heat until first side is golden and top is dry flip for just a couple seconds until dry on the other side and put in a warm oven on a plate to stay warm. Continue until the batter is gone and you should have about 8 or 10 crepes.

(You can use a small non stick skillet just make sure when you swirl the batter you cover only the very bottom of the pan.)


Strawberry Topping


In a small skillet place 1/4 cup strawberry jam or jelly and 1 cup of strawberries. I normally use frozen since they are generally out of season but if you have fresh you can definitely use them. Warm in the skillet until the jam is melted and the berries have softened int a sauce. Keep warm until ready to serve.


Cheese Filling


1 cup small curd cottage
2 Tbs low fat cream cheese
1 Tbs lemon juice
1/2 tsp vanilla
1 Tbs sugar
1/2 tsp cinnamon


In a small bowl mix together the cottage cheese and the cream cheese until blended together. Once smooth mix in the remaining ingredients and combine well.


Once all of the elements are ready take a crepe and put a tablespoon of filling in the middle of your crepe and fold over all side to make a little pouch. Continue with remaining filling and crepes and then put on the skillet one more time to seal the edges and hold them together. Place in the warm oven and let sit in there for 15 minutes to heat through your filling.


Serve two per person topped with the strawberry filling.


Raspberry Jelly

There are beautiful raspberries in season and I recently bought a crate of them and made jelly. They were beautiful huge berries and made some really tasty jam. This isn't really a recipe but more of a little tutorial because the process was kind of fun to document. I used Ball fruit pectin and used their directions for the jelly.


Here are shots of the equipment out and ready. It is kind of interesting to see how red the juice is when you are just starting and how dark it gets once the sugar gets dissolved into it. I skimmed the foam off to make the jelly extra clear and nice in the jar. I saved it though and ate it on a PB&J and it was delicious.


Jelly really is easy to make, you just have to make sure that you keep everything really clean and wipe the jars really well so your lids seal well. Below you see some of the finished product. I normally make several types of jelly and jam in the season and I love it every time. Hope you try making some. There is just something so nice about grabbing a jar of nice jam you made yourself in the middle of the winter!


Wednesday, July 15, 2009

Beer Bread

This week on Friday Baking with Not Quite June Cleaver I made beer bread. It was quite yummy and Jake and I ate it warm out of the oven with chili and soup.


It was a really simple recipe and I was able to throw it together quickly and have fresh bread. Will definitely work it into the repertoire!
Beer Bread

Preheat oven to 375.

3 cups flour (spoon into measuring cup…don’t dip and measure!)
1 tsp salt
3 tsp baking powder
3 TBSP sugar
One 12 ounce bottle or can of beer ~ light or dark
1/2 cup melted butter

Mix dry ingredients and beer. Pour into a 9″ loaf pan you sprayed with cooking spray. Pour melted butter over the batter. Bake 1 hour. Cool slightly in the pan and remove loaf from pan and let cool at least 15 minutes before cutting. This is a fairly crumbly bread but it is so tasty!

Saturday, July 11, 2009

Terriyaki Shish Kabobs


Shish Kabob anyone?
So I have been working on these shish kabobs for a while and I think I have got it right. The marinade is very good and really soaks in and flavors the meat nicely.


Terriyaki Shish Kabobs
½ cup soy sauce
2 tablespoons sugar
2 tablespoon lemon juice
2 cloves garlic smashed
½ tsp black pepper
1 lb round steak/cubed

In a pie plate, combine all ingredients but the steak and stir well to combine. Toss the steak in the marinade and cover with plastic wrap. Refrigerate for 1-5 hours. Remove from refrigerator and put on skewers and grill on high heat for 10 minutes on first side and 5 minutes on second side. Longer if you have thicker pieces of meat.

Serve with rice and side of your choice.


Green Beans with Mushrooms

A yummy side to cook along with the shish kabobs on the grill!

1 lb green beans, snapped and to your size preference
5 large crimini mushrooms, cut into bite size wedges
2 Tbs butter
1/2 tsp herb de provence (basil will work as well)
salt and pepper to taste
1 Tbs balsamic vinegar
Combine all ingredients on a large section of foil and bundle up tightly. Put on the grill when you start the meat and by the time the meat is cooked the beans should be just tender and mushrooms steamed to perfection. This would also work in a 350 degree oven for 15 minutes or so.

Thursday, July 9, 2009

Soft Pretzels


This week on Friday Baking with Not Quite June Cleaver I made the soft pretzels. I was torn as to which recipe to pick but I have never made pretzels before and thought it would be fun. I actually really had fun with it and they turned out really well! I am now thinking of what variations I could do on them, like a sweet version would be really good. I also enjoy jalapeno pretzels so I would love to try that out sometime. The possibilities….


I decided to add poppy seeds to mine with some salt since I like that and I am not as big of a salt fan. I also didn’t have pretzel salt so I used kosher and tried to wing it. They turned out good and tasted great hot out of the oven with some mustard! They were definately worth the effort to make and I will definately make them again.


Soft Pretzels
Makes 12

* 2 1/4 teaspoons dry active yeast (1/4 ounce)
* 1/4 teaspoon coarse salt
* 2 teaspoons sugar
* 1 cup warm water
* 3 cups all-purpose flour, plus more for surface
* 1/8 teaspoon cayenne pepper
* 2 tablespoons unsalted butter, softened
* Vegetable oil, for baking sheets
* 3 tablespoons baking soda
* 1 tablespoon pretzel salt
* Assorted mustards, for serving

Directions
1. Mix yeast, coarse salt, sugar, and warm water in a small bowl, whisking until sugar dissolves. Let stand until foamy, about 5 minutes.2. Mix flour and cayenne in a large bowl. Using a pastry cutter or your fingers, cut butter into flour until mixture resembles coarse crumbs.3. Slowly pour yeast mixture over flour mixture, stirring to combine. Using your hands, gather dough together. Turn dough out onto a lightly floured surface, and knead until it is no longer sticky, about 5 minutes. Cover with plastic, and let rise for 30 minutes.4. Cut dough into 12 pieces, and roll each into an 18-inch rope. Form a U shape with 1 rope, and twist ends together twice. Fold twisted portion backward along center of U shape to form a circle, then gently press ends of rope onto dough to seal. Transfer to an oiled baking sheet, and repeat. Let rise for 20 minutes.5. Preheat oven to 475 degrees. Bring a large pot of water to a boil, and add baking soda. Boil pretzels in batches until puffed and slightly shiny, 1 to 2 minutes per side. Transfer to wire racks to drain. Return to baking sheet, sprinkle with pretzel salt, and bake until golden brown and cooked through, about 15 minutes.
Pretzels will keep, uncovered, at room temperature for up to 12 hours. Rewarm in a 250-degree oven if desired, and serve with mustards.

Tuesday, July 7, 2009

Yummy Pot Pies


Last night for dinner Jake was hungry for pot pie so I decided to put some together. They turned out really good and we both liked the individual portions. Served with a salad they were really yummy and we both enjoyed them.


Turkey Pot Pie


1 recipe of your favorite double pie crust recipe
(I prefer to use Martha Stewart's Pate Brisee)
1 turkey breast boned and cubed into one inch cubes
1/2 pound new potatoes quartered
3 carrots sliced into even pieces
6-8 mushrooms sliced
3 ribs of celery sliced
2 cups frozen green peas
1 family sized can of cream of chicken soup
1 cup half and half
1 tsp herb de provence
1/2 tsp cracked pepper


Prepare dpie crust and refrigerate for one hour. While the crust is cooling heat a large skillet and saute the potatoes first until they are tender, then add the carrot and celery and cook stirring for 5 minutes. Once they are getting tender add the mushrooms and the peas. Once they are warm through and nearly cooked through remove from skillet and set aside. Add a bit more oil if needed and saute the turkey until seared on all sides and no pink remains. Add the vegetables back in and stir to combine. Stir in the cream soup, half and half, herb de provence, and pepper. Turn on low heat and simmer while you roll out pastry.


I made 4 individual portions in oven proof bowls but you can also make it in a 9 inch pie size. Roll out your dough and line your serving dish of choice. Fill with the turkey filling and top with your crust. Cut vent holes and bake at 400˚ for 30 minutes for individuals or 45-60 minutes for a whole pie.


Serve hot and enjoy.


French Toast and 4th of July in La Pine


Annual Fourth of July celebration

Each year we go to spend the 4th of July holiday with Jake’s family in La Pine, Oregon. We have a lot of fun and it is full of food traditions. We of course have to have Scott at the BBQ and do chickens as well as pork for the traditional Independence Day meal. This year for my contribution I did 6 dozen cupcakes of varying flavors, a green salad with strawberries and pear. I also made Crème Brule French Toast. It has become a bit of a tradition to make and it seems to be enjoyed by most. It is also a recipe you have to make and let refrigerate overnight so it works quite well for this type of situation. It also makes a wonderful Christmas morning option. You make it in a casserole dish and it forms the caramel sauce on the bottom so you dish it out and flip it upside down and it has its own syrup.

Once again we had a good time with family and we always look forward to seeing all of the family that we only get the pleasure of seeing once a year. We loved seeing all of you and look forward to next year and more food enjoyment!

Crème Brulee French Toast
2 cups Brown Sugar
1 cup Unsalted Butter
1 loaf French Bread, thick sliced
2 cups Half and half
8 Eggs
1 tsp Vanilla
1 tsp Cinnamon
1/2 tsp salt

In a saucepan combine the brown sugar and butter. Melt and stir constantly until the sugar is dissolved. Pour into the bottom of a 13X9 inch glass pan. Shingle the French bread in the pan over the caramel. Mix together the rest of the ingredients for the custard and pour over the top of the bread. Cover with plastic wrap and refrigerate overnight. Preheat oven to 350˚ and bake for 30-40 minutes until browned and puffed. Cut into squares and flip over on plate and enjoy. Serve along with maple syrup as well if you wish for a little excess.
Sorry I have no picture of the french toast. I will hopefully add one soon. I left before it was actually served so I didn't get one. Enjoy!


Thursday, July 2, 2009

Baguettes and Blueberry Pie


For this week on Friday Baking with Not Quite June Cleaver I chose to make the baguettes as well as the Blueberry pie. We enjoyed the baguettes this past weekend warm with jam and then I made a bread pudding with the leftovers on Monday with dinner. It was very good! Jake really enjoyed it but he doesn't like the harder crust on a baguette but he enjoyed it hot out of the oven.
I made the pie to take with us on out 4th of July camping trip. I haven't tasted it yet but it looks very good! The edges got a little brown but oh well... I am sure it will still get eaten just the same!


Have a very Happy 4th of July!

Peanut Noodles

So I have been thinking about starting a blog for a while and I wanted to incorporate food in it somehow. I saw that my college roommate Erika was doing Friday Baking with Not Quite June Cleaver and it gave me a perfect excuse to give it a shot. I want to also post recipes I create and things I try and like and post them here to share. I hope it is enjoyed and I can also use it as a collecting space for my recipe collection that is ever growing!
Last week Jake was away for the evening and I made one of my favorite new recipes which is a riff off of a Peanut Noodle Salad recipe I found on 101cookbooks.com. It is super tasty and I have changed it so that it is hot and tweaked the amounts subtly. Jake is not exactly a fan of tofu or Thai inspired foods so I tend to make it on my own to enjoy.


Thai Peanut Noodle Bowl

1 package Soba Noodles
4 spears of Asparagus cut into 1 inch chunks
1 baby bok choy sliced
½ cup cubed firm tofu
1/2 cup creamy peanut butter
1/4 cup white vinegar
drizzle of toasted sesame oil
1/4-1/2 cup hot water
¼ cup whole roasted peanuts

Bring a pot of water to a boil and boil the soba noodles until almost done. Then add in the Asparagus and Bok Choy, cook through and then drain and return to pan. Toss with tofu cubes lightly to incorporate. In a separate bowl combine the peanut butter, vinegar, sesame oil and hot water, mix until well combined and toss into the hot noodles and veggies. Plate and top sprinkled with the peanuts. This is a generous serving for one or two smaller portions.